Introduction to Tornado Costume Crafting
When Halloween approaches, crafting unique costumes becomes the mission of many festive celebrants. Why go the traditional route when you can stand out with a DIY tornado costume? This guide takes you through the whirlwind journey of creating your very own tornado ensemble. Imagine twirling into the party as a swirling vortex, catching eyes and perhaps some compliments along the way. In a sea of witches and warlocks, your tornado costume will blow them all away. Let’s take the necessary steps to ensure your costume is both impressive and practical. From gathering materials to the final ‘twist’, this post will help you conjure up a storm of creativity. So, whether you’re aiming to become a solo cyclone or part of a couple’s themed costume, let’s get started on your transformative and thrilling Halloween garb.
Materials Needed for Your Tornado Costume
To make a tornado costume that’s both eye-catching and comfortable, you’ll need the following materials:
- Laundry hamper: Choose a fabric pop-up style for the base of your costume. Ensure it is wide enough to fit around your body.
- Old coat hanger or strong wire: This will be used to add structure to the top of your costume.
- Wire cutters and duct tape: These tools will help you shape and secure the wire frame.
- Batting: You will need enough batting to create the swirling effect of a tornado.
- Grey tulle: This fabric will cover the batting, giving your costume the look of a cloudy vortex.
- Miscellaneous embellishments: Gather items like plastic animals, faux leaves, doll house picket fence pieces, or any other small objects to represent debris caught in the tornado’s path.
- Needle and strong thread: These will be essential for attaching the tulle to the costume.
- Hot glue gun and glue sticks: A quick and strong adhesive for securing embellishments.
- Optional extras: If you want to extend the costume beyond the waist, consider extra tulle and safety pins for wrapping around the legs.
Gather these materials, and you’re ready to create a costume that’s a whirl of fun. Remember to exercise caution when using tools like wire cutters and hot glue guns. In the next section, we will dive into how to construct the base of your tornado costume.

Step-by-Step Guide to Making the Tornado Base
Crafting a tornado costume starts with a solid base. Follow these steps for a successful foundation:
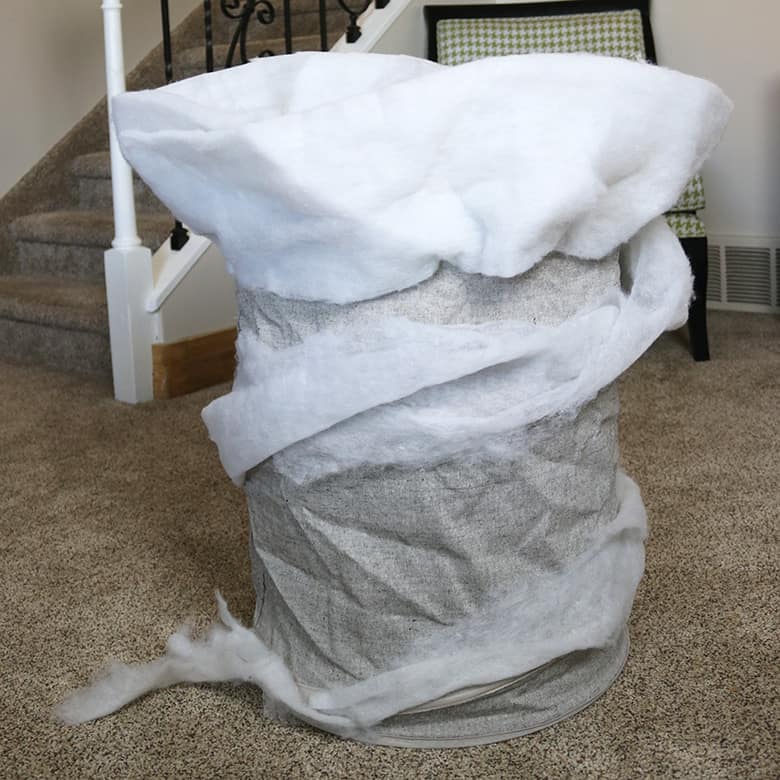
- Start with the Hamper: Take your fabric pop-up laundry hamper and cut out the bottom. Make sure the hamper fits comfortably around your body.
- Create Arm Holes: Determine the best spots for arm holes on your hamper. Make them about one-third down from the top. Cut carefully.
- Wire Frame for Shape: Cut the wire hanger into two pieces. Bend them into semi-circles. These will prevent the hamper from collapsing.
- Attach the Wire: Use duct tape to attach wire pieces to opposite sides of the hamper. The wire should stand upright, creating a fuller top.
- Test the Structure: Try on the hamper again. Check the fit and wire stability. Adjust if necessary.
By completing these steps, you’ve now set the stage for the dynamic features of your tornado costume. Next, we’ll tackle adding swirls and texture to bring your tornado to life.

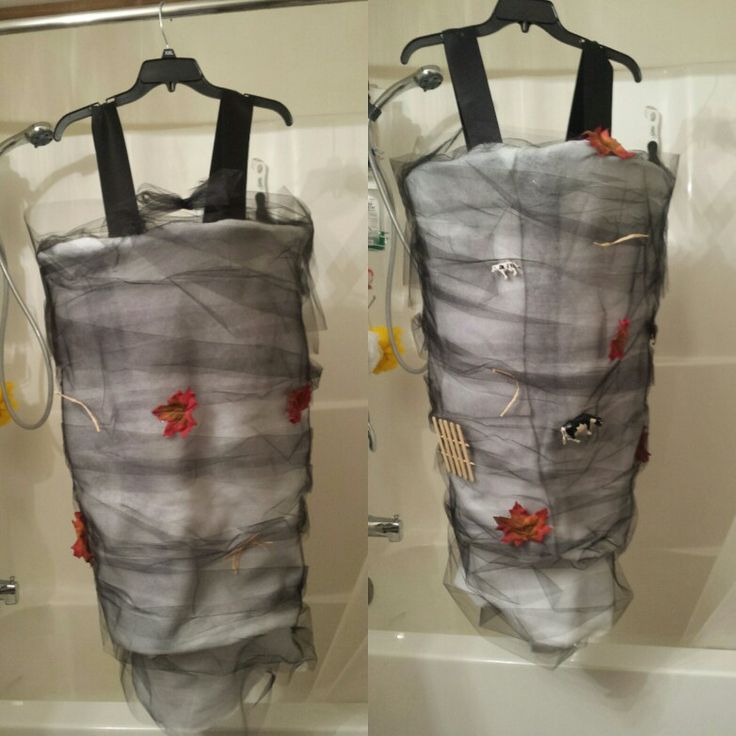
Adding Swirls and Texture with Batting and Tulle
After shaping your tornado costume’s base, it’s time to add the swirls and textures. These details will make your costume stand out, giving it depth and dynamism. Here’s how to do it:
- Wrap with Batting: Start from the top of the hamper. Wrap batting around it to create the first swirl. Use hot glue sparingly to keep it in place. As you move down, spiral the batting to mimic a tornado’s motion.
- Sew on Tulle: Once you have the batting in place, lay grey tulle over it. This tulle acts like the tornado’s cloudy exterior. Sew the tulle onto the hamper, moving in the same spiral direction. Large stitches work just fine.
- Add Volume: For a fuller look, stuff additional batting under the tulle. Continue wrapping and sewing until you’re happy with the shape.
- Tulle Overlays: Add another layer of tulle if you want to increase the costume’s complexity. Each layer adds to the swirling effect.
With these steps, your tornado costume will begin to take on a life-like appearance. The batting creates the structure of the swirls, while the tulle provides the necessary texture and movement. Keep your stitches simple and your materials secure as you build your costume from the top down. Next, we will secure the embellishments and thematic extras to your costume for that authentic tornado look.
Securing Embellishments and Thematic Extras
After giving your tornado costume its shape and texture, it’s time to add personality with embellishments and thematic extras. These items represent debris caught in the tornado’s powerful winds – a critical touch for authenticity. Below are the steps to add these creative details to your costume:
- Select Your Embellishments: Choose small, lightweight items such as plastic animals, faux leaves, and miniature fence pieces. These will simulate the effect of objects being swept up by the storm.
- Position Your Decorations: Arrange where each embellishment will go on the costume. Try to spread them out to avoid clustering in one area for a balanced look.
- Attach with Hot Glue: One by one, secure your chosen items using a hot glue gun. Take care not to burn your fingers and ensure each piece adheres well to the batting and tulle.
- Add Depth with Layering: To create depth, place some items underneath the top layers of tulle. This layering technique gives the illusion they’re truly engulfed in the whirlwind.
- Secure Loose Ends: Double-check that no sharp edges or loose parts are sticking out. Safety is key – secure any risky items with extra glue or remove them.
These simple steps will breathe life into your tornado costume, making it an exciting and dynamic part of your Halloween attire. Next, we’ll discuss important final touches to ensure your costume is safe, comfortable, and ready for a night of fun.
Final Touches: Safety, Comfort, and Mobility
After you have added the swirls, texture, and fun embellishments, there are several final steps to ensure your tornado costume is safe, comfortable, and easy to move around in on Halloween night.
- Check for Comfort: Try on your costume again. Move around to make sure it is not too tight and that you can walk and sit with ease.
- Secure the Costume: Make sure all hot glued items are firmly attached. Check that nothing sharp is exposed.
- Verify Visibility: Ensure that your costume does not obstruct your vision. Adjust the armholes if they limit your arm movements.
- Ensure Easy Removal: It’s important that you can take the costume off quickly if needed. Ensure that the structure allows for this.
- Mobility: If you added tulle around your legs, make sure it’s not too long. You don’t want to trip or get tangled up.
- Trial Run: Do a test run at home. Walk up and down stairs, and practice sitting to find any issues.
Safety is the top priority, followed by ensuring a comfortable fit that allows for a full range of movement. With these checkpoints addressed, your tornado costume is now ready for a swirl of fun at Halloween festivities!
Bonus Tips for a Couple’s Themed Costume
For twosome fun, here’s how to turn your tornado costume into a duo delight. These tips will ensure both you and your partner bring the stormy fun to any Halloween event.
- Coordinate Colors: Make sure both costumes use similar shades of tulle and embellishments. This creates a cohesive look.
- Divide and Conquer: Assign different tasks to each person. One can cut and place tulle, while the other attaches embellishments. It speeds up the process.
- Themed Add-Ons: Consider extra props that relate to tornadoes. One person can be the tornado, and the other a character, like a weather reporter or ‘Dorothy’ from the Wizard of Oz.
- Matching Details: Add similar debris items to both costumes. Use the same plastic animals or faux leaves for unity.
- Express Love with Sacrifice: If one partner is less enthusiastic, like the husband in Reference Blog1, appreciate their effort. It shows love and makes the experience memorable.
- Capture the Moment: Take fun photos in your costumes. This not only preserves memories but can also win you costume contests.
- Safety First for Both: Double-check each other’s costumes for safety. Ensure all parts are secure and comfortable.
- Enjoy the Process: Laugh and have fun while creating your costumes together. It’s a great way to bond.
With these tips, you and your partner are set for a whirlwind of a time. Happy crafting!
Conclusion: Bringing Your Tornado Costume to Life
As we wrap up this DIY guide, your tornado costume is almost ready to take by storm. You’ve learned how to make a tornado costume from scratch, mastered swirling designs, and safely secured eye-catching embellishments. But it’s not just about the crafting. Bringing your costume to life means embodying the whirlwind spirit this Halloween. Move with the energy of a cyclone, spinning and twirling to give off that authentic tornado vibe. Remember to wear your creation with confidence. It’s the unique, handmade touch that sets your tornado apart in a sea of store-bought costumes.
Wearing your tornado costume isn’t just for show; it’s a fantastic conversation starter. Delight others by sharing the creative process and your own experiences. Inspire friends and strangers alike with your dedication to the DIY spirit. Above all, have fun and stay safe. Enjoy the freedom of expression that only a custom costume can offer. Go out there, and let your hard work blow everyone away!