Selecting Your Hippy Costume Base
Choosing the Right Garments
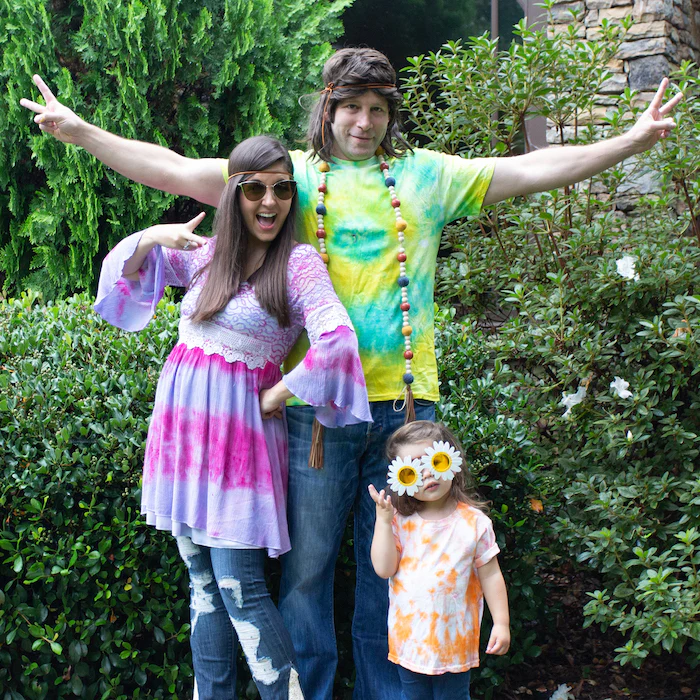
When embarking on how to make a hippy costume, start by selecting a comfortable base garment. Ideal choices include loose-fitting shirts, blouses with a psychedelic or floral pattern, or plain tees ripe for tie-dying. Look for fabrics such as cotton or linen that absorb dye well. For bottoms, consider wide-legged pants or long flowing skirts that embody the free-spirited essence of the hippy era.
Remember, hippies embraced individuality, so feel free to pick items that speak to your personal style. The key is comfort and self-expression. Opt for natural, earthy tones or bright, saturated colors that you can later enhance with tie-dye to add that authentic ’60s flair.
Where to Find Your Costume Pieces
Finding the garments for your hippy costume can be an adventure in itself. Thrift stores and vintage shops are treasure troves for unique pieces that carry the spirit of the hippy aesthetic. Such places often have a wide selection of pre-loved clothing that not only looks the part but also promotes sustainability, a value closely aligned with hippy philosophy.
Online marketplaces like Etsy or eBay offer a variety of options, from authentic vintage items to handcrafted clothing. Remember to check your own closet for any long-forgotten items that could be repurposed. Friends and family might also have pieces to lend. Be resourceful and enjoy the process of gathering your costume components – it’s all part of the creative journey.
Preparing for Tie-Dye
Before diving into how to make a hippy costume, proper preparation is key. The tie-dye stage is crucial for achieving that iconic hippy look. Here’s how to get started.
Materials Needed for Tie-Dyeing
First, gather all necessary tie-dye materials:
- A tie-dye kit (like Tulip’s Two-Minute Tie-Dye Kit) which typically includes dyes, gloves, and rubber bands.
- Plain garments such as shirts, leggings, or headbands made from natural fibers (cotton works best).
- A plastic cover to protect your workspace from stains.
- Plastic bags or wrap to cover your garments while the dye sets.
- Access to a sink for rinsing out your garments.
Ensure you have all these items before you begin to tie-dye your hippy costume garments.
Understanding Tie-Dye Techniques
Tie-dye is both an art and a science. Here are a few popular techniques to understand:
- Spiral: Pinch the center of the garment and twist into a tight spiral. Secure with rubber bands to achieve the classic circular pattern.
- Stripes: Fold or pleat the garment vertically or horizontally and bind with rubber bands for striped effects.
- Bullseye: Pinch a section of the fabric and pull upward, tieing bands at various intervals for a target-like design.
Each technique will create a different pattern, and part of the fun is experimenting to see which one you like best. For beginners, following instructions and practicing on an old piece of fabric can lead to better results on the actual costume. Remember, tie-dye is meant to be a unique expression, so there’s no ‘wrong’ way to do it. Let creativity guide your process as you learn how to make a hippy costume that stands out.
The Tie-Dye Process
Preparing your clothing for tie-dye is exciting and a crucial step in learning how to make a hippy costume. Ensure each piece is ready to transform into a vibrant piece of wearable art.
Soaking and Folding Your Garment
Start by soaking your selected garments in water. This helps the dye to soak in well. Once soaked, choose a technique to fold your clothing. Spiral patterns give classic circular designs. Stripes can be made with vertical or horizontal folds. Bullseye patterns need fabric to be pinched and banded at intervals.
Experiment with different folding styles. Each brings a unique, fun pattern. Make sure your clothes are tied tight with bands to keep the patterns crisp.
Applying the Dye and Setting the Color
Now comes the colorful part, applying the dye. Use gloves to keep your hands clean. Apply dye to the damp, folded garment. Choose your colors thoughtfully. Remember, where dyes meet, they mix, making new colors. Follow your tie-dye kit’s instructions carefully.
After applying, you’ll need to set the color. Use plastic bags or wrap to cover your garment. Let it sit, then rinse out the extra dye under cool water. Some kits allow for quick color setting in the microwave, like the Tulip Two-Minute Tie-Dye Kit. This saves time.
Now your garment is dyed and ready. It carries the spirit of the ’60s with vivid patterns and a custom touch. You’re on your way to completing your hippy costume masterpiece. This process is not just about creating a costume, it’s about embracing creativity and the hippy ethos of self-expression.

Customizing Your Hippy Costume
To truly capture the essence of the ’60s, customizing your costume adds that personal touch. Beyond tie-dye, there are numerous ways to enhance the hippy vibe of your attire.
Creating Bell Bottoms from Jeans
Transforming a pair of jeans into bell bottoms is a fun DIY project. Start with flared or wide-leg jeans for an easier conversion. Cut slits up the outside seams from the ankles to mid-calf or higher, depending on your preference. Insert fabric wedges—such as lace, floral print cloth, or more tie-dyed fabric—to widen the flare. Secure the inserts by sewing or using fabric glue like Aleene’s Fabric Fusion for a no-sew approach. This alteration captures the signature look of the hippy era.
Adding Embellishments and Trims
Embellishments give life to your hippy costume. Consider sewing or gluing on patches with peace signs or flowers. Adding trims like fringe, beads, or pom-pom detailing to shirt hems, jacket edges, or the bottoms of your newly created bell bottoms can elevate your outfit. Use fabric paint to add symbols like hearts and peace signs on your garments. Think of earthy or vibrant colors that tie back to your tie-dye palette. Adding these personal touches not only enhances your costume’s authenticity but also makes the crafting process more enjoyable.
Each customization reflects the individuality and creative spirit of the hippy culture. Aim for a homemade look that showcases your uniqueness and pays homage to the iconic fashion of the time. Don’t be afraid to mix and match, as hippies were known for their eclectic and carefree style choices.

Accessorizing Your Hippy Look
Accessorizing is key to nailing the hippy costume vibe. The right accessories can bring your costume to life, reflecting the hippy spirit of freedom and self-expression. Aim for a blend of fun, flamboyant, and natural elements. Remember, when learning how to make a hippy costume, there’s no such thing as too eclectic.
Selecting the Perfect Sunglasses and Headbands
No hippy outfit is complete without the iconic sunglasses and headbands. Look for round, oversized sunglasses with colorful or mirrored lenses. They will give you that classic ’60s look. For headbands, you can use bandanas, braided leather, or even a simple piece of fabric. Wrap them around your forehead for an instant touch of hippy style. You can also tie-dye your headbands for a perfect match with your outfit.
Headbands aren’t just stylish—they speak to the carefree and artistic soul of the hippy movement. Get creative. Use different colors and textures to stand out. You can even include beads or feathers for a unique touch.
Final Touches: Jewelry and Footwear
Top off your look with jewelry and footwear. Wooden beads, peace sign necklaces, and leather bracelets enhance the handcrafted feel of your attire. For footwear, sandals or even going barefoot can authenticate your hippy look. Fringed boots or moccasins also resonate with the era.
Layer your jewelry. Mix necklaces of various lengths or stack bracelets on your wrists. With footwear, comfort is crucial. Choose shoes that let you feel the earth beneath your feet, as nature connectivity was central to hippy culture.
With these accessory tips, your individuality will shine through your costume. Embrace the vibrancy and just have fun with it. That’s what the hippy ethos was all about—peace, love, and expressing your true self.
Care Instructions for Your Hippy Costume
Your hippy costume is a masterpiece of color and creativity. To keep it looking great, proper care is key.
How to Wash and Maintain Your Tie-Dye
Caring for tie-dye is simple but requires attention. Here’s what to do:
- Wash Alone: During its first wash, run your tie-dye garment solo. This prevents dye transfer to other clothes.
- Cold Water: Use cold water for washing. It helps maintain the vibrancy of the dye.
- Gentle Detergent: Opt for a mild detergent. Strong chemicals can fade your tie-dye.
- Avoid Bleach: Never use bleach on tie-dye as it can strip away colors.
- Dry Naturally: If possible, air dry your costume. Avoiding high heat keeps the dye intact.
- Iron Inside-Out: If you need to iron, do it inside-out on a low setting to prevent dye fading.
Follow these steps to ensure your costume stays as fresh as the day you made it. Keep the love for your hippy costume alive with proper washing and maintenance.

Where to Find Supplies
Crafting your own hippy costume starts with gathering your supplies. You’ll need tie-dye kits, garments, and accessories to bring your vision to life.
Purchasing Tie-Dye Kits and Accessories
For the first step, pick up a tie-dye kit. Look for one like Tulip’s Two-Minute Tie-Dye Kit, mentioned in the reference blog. These kits can be found easily online. Amazon is a top choice for fast and convenient shopping. They provide all you need: dyes, gloves, and rubber bands. Also, they come with a guide to help you.
Next, hunt for additional items to customize your costume. You might need fabric glue, trims, or beads. Places like craft stores or online marketplaces are good spots to check. They offer a vast selection. Remember to keep the hippy spirit in mind. Hunt for vibrant colors and natural materials during your search.
Last, consider fun extras. Sunglasses, headbands, and jewelry add to the hippy look. Amazon or specialty stores have these. They’ll top off your outfit perfectly.
Having all your supplies ensures a smooth crafting experience. It also opens the door to express your creative flair. Happy crafting and peace out!


