Oogie Boogie, the mischievous villain from The Nightmare Before Christmas, is a beloved character known for his creepy yet comical appearance. If you’re looking to make a splash at your next Halloween party, creating an Oogie Boogie costume is a fantastic choice. This article will guide you through the process, from gathering materials to assembling the final product.
Planning Your Oogie Boogie Costume
Before diving into the construction, it’s essential to plan your costume. Consider the following factors:
- Level of Detail: Decide how intricate you want your costume to be. Are you aiming for a simple, basic version, or a highly detailed replica?
- Materials: Research the materials needed for each component of the costume. Some options include burlap, fabric paint, stuffing, and wire.
- Budget: Set a budget for your costume. This will help you make informed decisions about materials and construction methods.
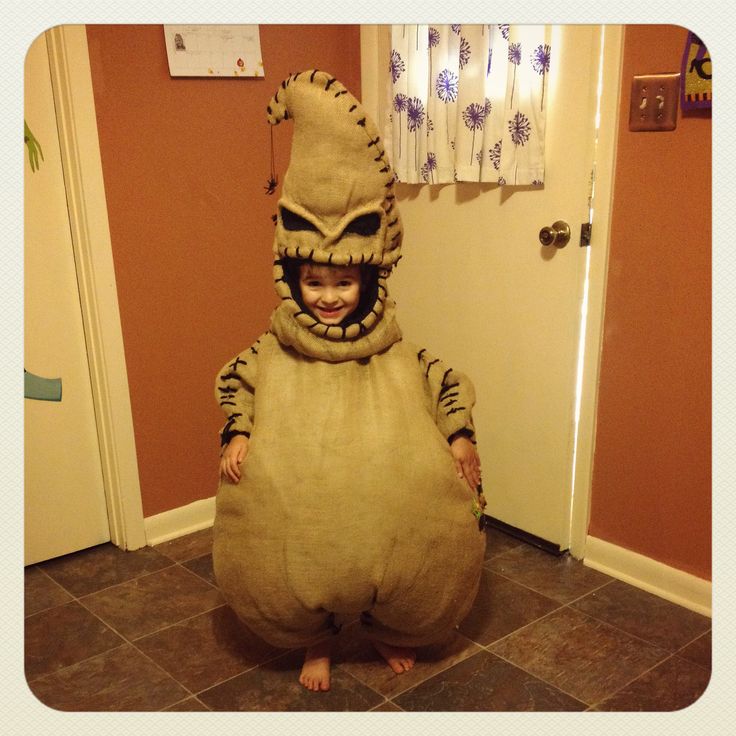
Creating the Oogie Boogie Body
The body is the foundation of your Oogie Boogie costume. Here’s how to create it:
- Gather Materials: You’ll need burlap, stuffing, and wire.
- Create the Frame: Using wire, construct a basic frame for the body. This will provide structure and support.
- Stuff the Body: Fill the frame with stuffing to create a plump, rounded shape.
- Cover with Burlap: Wrap the stuffed frame with burlap, securing it with stitches or glue.
Tips for adding any finishing touches or accessories to complete the costume
To complete your Oogie Boogie costume, consider adding the following finishing touches and accessories:
Accessories:
- Top Hat: A classic top hat is a quintessential Oogie Boogie accessory. You can purchase a ready-made hat or create your own using cardboard, fabric, and glue.
- Cane: A cane can add a touch of elegance and menace to your costume. You can use a real cane or create your own using a wooden dowel, fabric, and ribbon.
- Creepy Dolls: Oogie Boogie is known for his collection of creepy dolls. You can purchase or create your own dolls using fabric, stuffing, and buttons.
- Other Accessories: Consider adding other accessories, such as a scarf, a belt, or a necklace, to personalize your costume.
Weathering and Distress:
- Tea Staining: Steep the burlap in strong tea to create a weathered and aged look.
- Paint Effects: Use paint effects, such as dry brushing or distressing, to simulate wear and tear.
- Artificial Dirt: Add artificial dirt or mud to the body and limbs to give them a more realistic appearance.
Lighting Effects:
- Glow-in-the-Dark Details: Add glow-in-the-dark paint or fabric to the eyes, teeth, or other details for a spooky effect.
- LED Lights: Incorporate small LED lights into the costume for a more dramatic and eye-catching look.
Props:
- Bag of Bugs: Create a bag filled with fake bugs or insects to carry with you.
- Creepy Doll Box: Bring along a creepy doll box or trunk to add to your villainous persona.
Personalization:
- Add Your Own Touch: Incorporate your own unique touches to make your costume truly special. This could include adding personal items, such as a favorite piece of jewelry or a meaningful symbol.
By adding these finishing touches and accessories, you can elevate your Oogie Boogie costume to the next level and create a truly memorable and unforgettable look.
Making the Oogie Boogie Face
The face is a crucial element of the Oogie Boogie costume. Here’s how to create it:
- Gather Materials: You’ll need fabric paint, white fabric, and black fabric.
- Cut Out Pieces: Cut out pieces of white fabric for the eyes and mouth.
- Paint the Face: Paint the burlap body with a base color, such as brown or gray. Then, use fabric paint to create the facial features.
- Attach the Eyes and Mouth: Glue or sew the white fabric pieces onto the painted face to form the eyes and mouth.
Materials Needed
Here’s a list of materials you’ll need to create your Oogie Boogie costume:
Body:
- Burlap
- Stuffing (e.g., polyester fiberfill, shredded foam)
- Wire (e.g., chicken wire, coat hanger)
- Scissors
- Needle and thread or sewing machine
- Glue (e.g., fabric glue, hot glue)
Face:
- Fabric paint (black, white, and other colors as desired)
- White and black fabric for eyes and mouth
- Fabric glue or sewing supplies
Arms and Legs:
- Burlap
- Stuffing
- Wire
- Scissors
- Needle and thread or sewing machine
- Glue
Additional Materials:
- Accessories (e.g., top hat, cane, creepy dolls)
- Weathering materials (e.g., artificial dirt, tea bags)
- Optional: Bugs and stitches materials (e.g., felt, fabric, embroidery floss)
Remember: The specific materials you’ll need may vary depending on the level of detail and complexity you desire for your costume.
Adding the Oogie Boogie Arms and Legs
The arms and legs are essential for completing the Oogie Boogie look. Here’s how to create them:
- Gather Materials: You’ll need burlap, stuffing, and wire.
- Create the Limbs: Follow the same process used to create the body, using wire for the frame and stuffing for the filling.
- Cover with Burlap: Wrap the limbs with burlap and secure them to the body.
Tips for how to add dimension and texture to the body
To create a more realistic and three-dimensional Oogie Boogie body, consider incorporating the following techniques:
Layering:
- Add Layers of Burlap: Instead of using a single layer of burlap, layer multiple pieces to create a more textured and uneven surface.
- Vary the Sizes: Use different sizes of burlap pieces to create a more varied and interesting look.
Stuffing Techniques:
- Use Different Stuffing Materials: Experiment with different stuffing materials, such as foam, cotton balls, or even shredded paper. Each material will create a unique texture and feel.
- Create Pockets: Stuff small pockets of burlap with different materials to create raised areas and bumps on the body.
Texturing Techniques:
- Fabric Paint and Texture Mediums: Use fabric paint mixed with texture mediums, such as sand or glitter, to create a rough and textured surface.
- Embroidery: Add embroidery stitches to the burlap to create intricate patterns and designs.
- Appliqués: Attach fabric appliqués, such as leaves, flowers, or bones, to the body for added texture and visual interest.
Aging Techniques:
- Tea Staining: Steep burlap in strong tea to create a weathered and aged look.
- Paint Effects: Use paint effects, such as dry brushing or distressing, to simulate wear and tear.
- Artificial Dirt: Add artificial dirt or mud to the body to give it a more realistic appearance.
Wire and Structure:
- Add Wire Details: Incorporate wire details, such as veins or ribs, to create a more defined and anatomical look.
- Vary the Wire Thickness: Use different thicknesses of wire to create a variety of textures.
By combining these techniques, you can create a truly unique and realistic Oogie Boogie body that will capture the essence of the character. Experiment with different materials and techniques to find the perfect combination for your costume.
Finishing Touches
To complete your Oogie Boogie costume, add some finishing touches:
- Add Accessories: Consider adding accessories such as a top hat, a cane, or a creepy doll.
- Weather the Costume: To give your costume a more aged and weathered look, you can distress the burlap or add artificial dirt.
Instructions for adding any additional details such as bugs or stitches
Once you have the basic structure of your Oogie Boogie costume, you can add details to make it truly unique. Bugs and stitches are two popular options to enhance your costume.
Adding Bugs
- Choose Your Bugs: Decide what kind of bugs you want to include. Popular choices include spiders, beetles, and worms.
- Create the Bugs: You can use a variety of materials to create bugs, such as felt, fabric, or plastic. Cut out shapes for the body and legs, and glue them together.
- Attach the Bugs: Place the bugs on different parts of your costume, such as the face, arms, and legs. You can use glue, pins, or even sew them on for a more permanent look.
Adding Stitches
- Choose Your Stitches: Decide where you want to place the stitches. They can be used to create a more ragged and distressed look, or to add a touch of whimsy.
- Create the Stitches: You can use fabric paint, embroidery floss, or even real thread to create stitches. Draw or paint the stitches directly onto the burlap, or sew them using a needle and thread.
- Vary the Stitches: Experiment with different stitch patterns and sizes to create a unique and personalized look.
Additional Tips
- Mix and Match: Combine bugs and stitches for a more dramatic effect.
- Consider the Theme: If you’re attending a specific themed party, try to incorporate elements of that theme into your details.
- Have Fun: The most important thing is to enjoy the process of adding details to your costume. Let your creativity run wild!
By following these tips, you can create a truly one-of-a-kind Oogie Boogie costume that will be the envy of all your friends.
Creating an Oogie Boogie costume is a fun and rewarding project. By following the steps outlined in this article, you can craft a unique and memorable costume that will be the talk of the party. Remember to have fun with the process and let your creativity shine!